Tuesday, February 26, 2013

Spring Cleaning Checklist

 Are you ready for some warm weather?  If you are, you can start prepping now for your apartment's spring cleaning.  Check out this week by week chart to get your house ready for summer and spring.  Keep reading to learn some tips and tricks for your spring cleaning marathon.


I don’t know about you, but by mid-February each year, I’ve had it with winter. I’m tired of the short days, the cold weather, and flu season. Maybe most of all, I’m tired of the dirt and grime that seems the settle on everything — my house, my car, my kitchen floors — after the snow becomes mixed with road salt, soot, and dirt and finds its way into every nook and cranny. You can imagine, then, how delighted I am to say that spring cleaning season is just around the corner. (See also: Control Your Allergies with Regular Cleaning)

Don’t know where to start with your own spring cleaning? Try breaking it up into small, manageable bits by assigning just three tasks to each weekend in March. Follow my week-by-week checklist below to restore order and cleanliness to your home and prepare for a relaxing, rejuvenating spring!

Week One: De-Clutter Your Kitchen
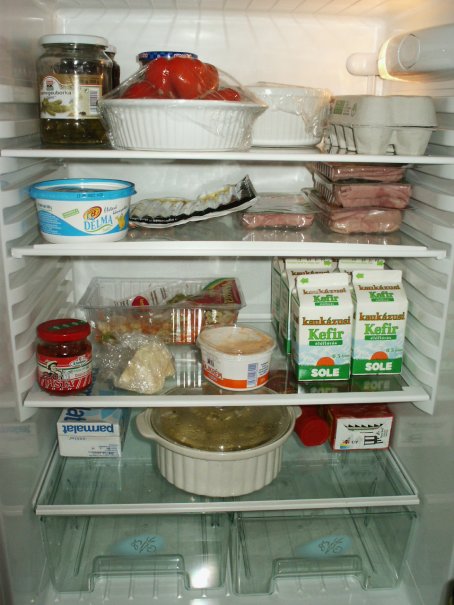

1. Fridge

I know, I know. We all hate to clean the fridge, but what better time to do it thoroughly than spring cleaning? Start by cleaning out the freezer. Although the USDA says frozen foods remain safe to eat indefinitely, you do start to sacrifice taste and food quality after a certain amount of time. Use their chart to determine whether to throw away that casserole in your freezer. Next, clean your freezer with a sponge and 1:3 mixture of vinegar and water (vinegar is safe on areas that touch food and will remove stains and odors). Repeat with your refrigerator. Finish by dusting the top of the fridge, wiping down the sides, and vacuuming your refrigerator coils. Added bonus: Keeping your coils clean can help your refrigerator run more efficiently, saving you money.

2. Cabinets

“Cabinets” is a broad area to clean, I know. My advice pertains more to organizing your kitchen cabinets than to cleaning the outside of them, however. Attack your spring-cleaning cabinet organization by assessing the problem areas (junk drawer, Tupperware cabinet, or pots and pans cabinet, for example). Try to articulate what the problem is, and why it’s a problem for you. For example, my pots and pans cabinet is in shambles because my BF loves to throw things in there all willy-nilly after they come out of the dishwasher. Think of a solution that might address the root of the problem. For me, that would involve either buying a pot rack to hang my pots and pans (one per hook; problem solved!) or making clear dividers in the cabinets (skillets on the left, sauce pans on the right, thank you very much). It could be as simple as delineating the spaces with two tablecloths, or could be solved with an organizational tool from the store.

3. Oven/Dishwasher

OK, there’s nothing really similar between an oven and a dishwasher, but I said just three tasks per weekend, right? Plus, all you really need to do for the oven is turn on the self-cleaning feature or, for a lighter cleaning, use these oven-cleaning tips from Good Housekeeping. To clean your dishwasher, start by wiping down the outside and work your way in. Wipe the front, sides, and bottom (none of which gets washed during a normal cycle), and then clean debris out of the spinning arms and the grate/grill under the arms. Finally, run an empty cycle with distilled white vinegar to help remove hard water deposits and other grime you can’t reach. Week one: done!

Week Two: Beautify Your Bedroom

Bed

1. Thin the Herd (in Your Closet)

I clean my closet every six months or so but still seem to find a bounty of clothes to discard after each go-round. To decide which pieces to keep and which to give away, I go with the six-month rule: If I haven't worn it in six months, I probably won't miss it if it goes. In fact, I can't ever remember thinking, "I wish I had kept that out-of-date white sweater; it would go great with these shoes!" After a healthy wardrobe trimming, switch out your winter clothes for the lighter-weather wear. Decide whether you’re a person who likes to organize by color or by type. Store out-of-season clothing under the bed or in an out-of-the-way spot.

2. Organize Dresser Drawers

Dresser drawers are kind of like kitchen cabinets and luckily, you have experience organizing those from week one. Do the same for your boudoir boxes and systematically identify problem areas, causes, and solutions. In my case, my sock drawer is a real pain. I have trouser socks, warm fuzzy socks, and running socks all jumbled together in one, socky mess. A simple solution is to sort socks by use (work, casual, and running) and divide the drawer according. For a budget-friendly solution, try using shoe boxes, pencil organizers, or tissue boxes.

3. Tend to Bedding

There is conflicting advice on whether you should flip your mattress every so often in order to lengthen its useful life; I’m in favor of the practice. You might also want to vacuum your mattress using the upholstery attachment on your vacuum cleaner and then cover your mattress with a good cover to help keep dust mites and allergens at bay. While you’re at it, either replace old pillows or check to see whether you can wash them (most types of pillows, whether made from natural or synthetic materials, are machine-washable). Lastly, change out your warm, winter blankets and comforter for lighter bedding.
ARTICLE CONTINUES BELOW
ADVERTISEMENT

Week Three: How About That Home Office?
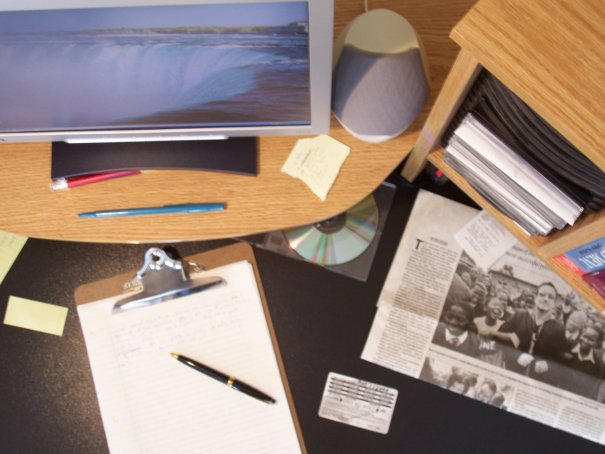
Office

1. File, File, File

Of all the tasks on my spring cleaning list, this is the one I dread the most. On the other hand, I know it will feel amazing to finally have my file drawers organized. During week three of March, organize your file drawer. If you don’t have a designated file cabinet or file drawer, you should. Motivate yourself to organize by buying brightly colored labels (I love Post-It® Filing Tabs! Download coupons here.) and hanging file folders. Then, get to filing — my folders are divided by categories like insurance information, taxes, medical bills, receipts, coupons, etc. If you already have a filing system in place, use this time to go through documents and shred what you no longer need. Here is a list of how long to hold on to important documents.

2. Clean Up Your Computer

Spring cleaning isn’t just about cleaning your physical space; it’s about the electronic sphere, too. There are a number of quick tasks you can do to improve the speed of your PC or Mac, including getting rid of unused files and programs, cleaning up your desktop, and defragmenting your hard drive.

3. Update Antivirus & Anti-Spyware Software

After you’ve improved the speed of your computer, keep it safe by updating your antivirus and anti-spyware software. Top Ten Reviews has a comprehensive list of the best antivirus and anti-spyware programs available, while PCWorld has reviews of the best free antivirus and anti-spyware out there. Finally, don’t forget to put a file backup strategy in place, so you don’t lose all your important electronic documents or programs.

Week Four: Tackle Outdoor Spaces

Patio Chairs

1. Clean Gutters

If you’re a homeowner, you’ll want to periodically clean out your gutters in order to prevent water damage to the roof and walls of your home. DIY Network has a great tutorial on cleaning and repairing your gutters yourself.

2. Clean Outside of Windows

As the weather gets warmer and the days get longer, let in more sunlight by cleaning the outside of your windows. Start by clearing away cobwebs and debris using a soft cloth, then clean the glass itself using a window-cleaning product or a 1:1 mix of vinegar and hot water (vinegar to the rescue again!). Make your job easier by purchasing a squeegee to wipe of excess water and prevent streaks. Wipe dry.

3. Clean Patio Furniture

Nobody likes to sit on a dirty, mucky patio chair. Increase the chances that you’ll make use of your outdoor spaces this season by cleaning your patio furniture. Mix dishwashing liquid with warm water and use this with a brush to scrub tables and chairs. While you’re at it, clean up your porch or patio by clearing away debris and sweeping the area. Treat stains with a 1:3 mixture of bleach and water and scrubbing the area with a hard-bristle brush.
There, you’ve made it! Four short weeks of three tasks per week. Now sit back, and enjoy the weather! Or, if you have extra time, take care of some other miscellaneous once-a-year tasks:
  1. Change your air filter
  2. Clean out your dryer ducts to help prevent fires
  3. Inventory items in your home in case of theft or fire
  4. Discard old beauty and bath products
    For more information see Wisebread.

Tuesday, February 19, 2013

How to Afford DIY Projects In Your Home?

diybudget021513.jpgAre you trying a new project in your college apartment?  New DIY projects can be expensive, but with these tips you can make sure any new project affordable.  Make sure to recycle, shop at sales, and refurbish old pieces to create your new piece for your apartment.

Choose Cheaply
The best DIYs are those which take trash and turn it into treasure. And by "trash" I mean hand-me-downs, flea market finds and ubiquitous big-box store pieces. Choosing affordable objects to makeover to begin with not only saves money, but gives you the freedom to take chances, change your mind, and mess up. If it doesn't work out the way you planned, at least you didn't invest too much in the process.

We have some great posts in our archives on budget DIY projects, so get searching and get inspired!

Beg, Borrow and Steal
Ok, so we can't really advocate stealing, but everything else is fair game. DIY can mean investing in a lot of equipment, some of it expensive, and some of it the kind of "affordable" extras that can really add up. Rather than shelling out for reusables like drop cloths, paintbrushes and tools, why not see if a friend or neighbor has any to spare?

When it comes to power tools or other expensive equipment, consider renting if you can't borrow. Your local hardware chain store probably offers this service, and for something you'll only use once or twice (say, a floor sander or tile cutter) it makes sense to cut down on cost, not to mention storage space. Bonus: renting tools often comes with support on how to use them properly, unlike a purchase, which can leave you reading the manual and scratching your head in confusion.

Know your Limits
One of the best ways to keep your DIY budget in check is to know when DIY isn't such a great idea. Online tutorials and crafty books are great, but they can only lead you so far in this game. Tackling a project beyond your skill level can lead to costly mistakes and professional re-dos, and spending more money than you ever planned. So think hard about where your DIY line is: wallpapering your bedroom? Adding shelves to your kitchen? Re-upolstering a beloved piece of furniture?

Before you entirely give up on that ambitious project, however, consider a few educational options to help it run smoothly: take a class at your local hardware store, or ask a handier friend to help you out.


For more information see Apartment Therapy.

Tuesday, February 12, 2013

Cleaning Schedule For The Busy Person in Your Life

Everyone can get super busy during the week, and then cleaning a home can get put on the to do list.  Check out this cleaning schedule for you to keep up with your cleaning every day of the week.  These simple tips and tricks will help your apartment stay clean throughout the week, instead of just once a month.

Home Cleaning Schedule

Daily
Every morning when I get up, and right before I go to sleep, I have a routine that I stick to. It really doesn't take up much time, but doing this can help speed things along. Although this is not included in the 20 minutes, this takes no more than 10 minutes a day, and easily can become second nature. I've put these cleaning tips in order of how I accomplish them during my day.

Make bed - 30 seconds
Put away clothes and jewelry from night before - 30 seconds
Swipe toilet (I only clean out the inside if it looks dirty) -30 seconds
Wipe bathroom mirror with Windex wipe -15 seconds
Wipe bathroom sink with GreenWorks Wipe -15 seconds
Spray shower with shower spray - 5 seconds
Wipe fingerprints off table in living room - 5 seconds
Wash, dry and put away dishes -5 minutes
Sweep floor - 1 minute

The longest part of this list is obviously washing the dishes. If you are severely pressed on time, you can always use paper. I've found the easiest way to keep the dishes in control is to wash them as you use them. Otherwise, by dinner time, you can wind up with a big, uninspiring pile.

Second Nature
Some parts of my home cleaning schedule, are things that I don't really think about, but just do. These also help to cut down on clutter and allow you to spend only 20 minutes a day cleaning.

As I mentioned already, wash the dishes as you use them
Wash laundry on the go (either throughout the day over the week, or all at once at a laundromat)
Pick up your stuff whenever you leave the room
Sort the mail as soon as you get it

These are all a part of my daily routine. As for weekends, sometimes I do them, sometimes I don't. I enjoy sleeping in on the weekends, and generally have found my home cleaning schedule to get in the way. Home cleaning can be enjoyable, and even a bit Zen-like, but there are so many fun things to do. Who wants to clean all the time?

Weekly & Monthly

Okay, here come the biggies, my Weekly and Monthly home cleaning schedules. For the week, I have my days divided like this:

Monday-Home Sprint
Tuesday-Special Room(s) Day
Wednesday-Bills
Thursday-Home Sprint
Friday-Declutter

As you can see, Saturday and Sunday are not here. Why? Because I don't like cleaning on the weekends. Monday thru Friday, I organized my home cleaning so that I only need to spend 20 minutes to keep my home sparkling. You can too! Let me explain what each day means.

Home Sprint
Monday and Thursday are my Home Sprint days. On each day, for 20 minutes, I focus on completing ALL of the following:

Cleaning the Fish Tank
Dusting
Wiping all mirrors with a windex wipe
Wiping all door handles and light switches with a GreenWorks wipe
Wet Swiffering the kitchen floor
Emptying the trash
Watering the plants
Vacuuming

In only 40 minutes a week, I can race through all of these. I bet you can too!

Special Room(s) Day
Every Tuesday is Special Room(s) Day. This is actually my entire monthly schedule, right here! Each Tuesday of each week, I focus on a different section of my home, for a total of four sections.

Week 1: Porch & Kitchen
Week 2: Bathroom & Study
Week 3: Living Room
Week 4: Bedroom

For 20 minutes, I'll focus some particular parts that need a deep cleaning, like the inside of the kitchen trash can, or polishing the silver in the living room. For busy people who have more rooms, you don't have to just limit yourself to 4 Weeks, take a few extra if you need. The idea here is to only clean for 20 minutes and then STOP. You'll be surprised at how much of a focused home cleaning you can do in just 20 minutes. If you need a more in depth list on how to clean these areas, check out Flylady.net. She talks about something called "Zone Cleaning" which is similar to this idea, and she has detailed cleaning lists and cleaning tips that are great for people that aren't sure where to start.


For more information see Yahoo.

Tuesday, February 5, 2013

Grow Plants from Kitchen Scraps


 Did you know that you can grow plants from kitchen scraps?  Take those leftover onions or parsley and use to grow more right in your own home.  Anyone can do this easy task, and it can save you money in the long run.  Keep reading to learn how!

Kitchen Scraps & Growing Plants


I love composting all the kitchen scraps I can but when I fill up my compost bin or run low on some vegetables in the garden using kitchen scraps to grow plants is a great activity. I love using kitchen scraps to start new plants as a fun gardening activity with my son, everyday we check and see how the plants are progressing. It’s a great way to come full circle on produce we bout at the market together and cooked together. Starting your own plants from kitchen scraps is really easy and for a gardening nerd like me!

If You are going to attempt this I suggest making sure the scraps you start with are good quality, I like to use organic produce grown locally when I start plants from kitchen scraps.
Growing Leeks, Spring Onions, Scallions ,and Fennel

You could go out and buy some vegetable specifically for growing but I like to wait till I actually have a call for them in my cooking. With all 5 of these examples you will use the end of the vegetable with the white roots.


green onions from kitchen scraps

Take the left over white roots and place them in a container with a small amount of water in it. You want the roots to be wet but you don’t want the entire thing submerged. Take your container and place it in a sunny window sill. I’ve actually grown green onion scraps in a fairly shady window on the north side of our house, your success may vary. I like keeping some in a window in the kitchen for my morning eggs, and in my office for snacking on (the wife loves kissing me after that). Within 3-5 days you will begin to see new growth come up. Remove the produce as you need and just leave the roots in the water to continually harvest your kitchen scrap crops. You should refresh the water weekly to keep the plant healthy.
Growing Lemongrass


lemon grass from kitchen scraps

Lemongrass is similar to all other grasses and because of that you just need to place the roots you cut off into a container with water and put in a sunny window. In my experience the lemongrass is a little more dependent than green onions and leeks from above.

After about a week there should be some new growth from your lemongrass. Once you have new growth you will need to transplant the plant from the water into a pot with soil and put it back into the sunny windowsill. You want to wait till your lemongrass reaches a foot tall before you begin harvesting it. Just like before cut off what you plan to use in the kitchen and allow the roots to continue to sprout. It’s just like cutting your lawn, it will just keep coming on if you keep it healthy.


Growing Romaine Lettuce, Celery, Bok Choy & Cabbage

Just like the scallions, you will take the white roots of these vegetables to grow your produce. By cutting of the stalks or leafs with an inch or more and placing them into a bowl of water with the roots facing down you will be on your way. You want to make sure the roots are in water but you don’t want to submerge the entire plant. Make sure to place the bowl into a sunny window and spritz it with water weekly to keep the top of the plant moist.


grow bok choy from kitchen scraps

Several days later you will begin to see the roots and leaves sprouting. 7 to 10 days in remove the plant from the water and plant it into soil with only the leaves above the soil. Your plant will continue to grow and in several weeks you will have a new head ready to be harvested.

If you want a different way to go with your pant you can try planting directly into the soil, skipping the water staging step from before. Keeping the soil from drying out will be very important that first week.
Growing Ginger


growing ginger from kitchen scraps

If you’re looking for an easy plant to grow indoors Ginger is the one for you. Just take you’re a chunk of Ginger from your kitchen scraps and place it into the soil. Make sure the newest buds are facing up. Unlike the other plants we’ve talked about so far Ginger will enjoy filtered light rather than direct sunlight.

Soon enough you will begin to see new growth sprouting up out of the soil, and under the soil roots will begin to sprawl out into the soil. After the plant acclimates to its new home you will be ready to harvest the next time you need Ginger. Pull the entire plant out of the soil and cut off a the pieces you need, and just replant it like you did initially.

As an added bonus for you Ginger makes a great house-plant. Even if ginger isn’t your thing as far as cooking goes you can still get some aesthetic value out of the plant.
Growing Potatoes

Taking potatoes from produce back to growing is a great way to keep more waste out of the garbage. You can grow any variety of potato you like, it should just make sure the scrap has ‘eyes’ growing on it. With a potato that has a strong presence of eyes you can chop it up into 2 inch square pieces. Make sure each piece has 1 – 2 eyes. After you’ve cut your potato into pieces leave them out in room temperature for a couple of days. Leaving the pieces out allow the cut surface area to dry out and become callous which will prevent the pieces from rotting in the ground.


cut & dried potatoes from kitchen scraps

Potatoes need a very nutrient-rich soil, so if you have compost you should be sure to incorporate some into your soil before you plant it. When you are planting your potato cubes make sure they are in the 8 inch depth range with the eyes facing the sky. When you back fill your cube place 4 inches over the potato cube and leave the other 4 inches empty. Over time as your potato grows and roots begin to appear you will want to add more soil.
Growing Garlic


indoor container gardening garlic

You only need a single clove to regrow an entire garlic plant, just place the end with the root down into the soil. Place your container in a warm part of your home with direct sunlight and sit back and wait for the garlic to root itself and begin to send up new shoots. After the garlic becomes established in the soil cut back the shoots and the plant will begin to put all its resources into growing a big delicious garlic bulb. Just like the ginger above once you harvest your produce you can repeat this process and run through the cycle again.
Growing Onions

With onions your going to use the root end you cut off when prepping to cook your onions. Onions are great because of the ease to propagate. You want to try to keep half an inch of onion above the roots. You will want to take your cutting and place it into your soil in a sunny place and cover the top with topsoil. Keeping your soil moist will be very important while the onion begins to establish itself. If you’re in the North East like myself you will want to keep the onion indoors in a container during the winter.

If you repeat the cycle and keep planting the onion roots eventually you should have enough onion plants going that you’ve become onion self-sufficient!
Growing Sweet Potatoes


indoor container gardening garlic

When you plant sweet potatoes you want to use the ‘eyes’ just like you do with a regular potato. You can bury the entire potato or pieces like you did with regular potatoes under a thin layer of topsoil in a damp and sunny place. Soon you will have new shoots beginning to appear from the soil. When the shoots begin to reach a height of four inches you will replant your pieces giving them around 12 inches between one another. Generally it take somewhere around 4 months to grow sweet potatoes like this. Keep a watchful eye out for slugs, they will be trying to eat your crop before you can.

When your growing your own sweet potatoes you want to be sure and use an organic soil as most commercial growers use chemicals to keep them from shooting.
Growing Mushrooms

For the most part I’ve focused on plants that are pretty easy to grow, propagating mushrooms is not included in that. If you’re going to try to propagate mushrooms you’ll be competing with the other fungi space. Mushroom spores enjoy warm humidity and nutrient rich soil, cooler temperatures will give your mushrooms a higher likelihood of success against other fungi


Shiitake Mushrooms

You want to grow mushrooms in a pot, trying to grow them in your garden would have too much competition from other mushrooms. Growing mushrooms inside of a container also allow you to mow the container around and provide different conditions for the mushrooms, which will help them propagate faster. I’ve experience the greatest success by providing a warm filtered light during the day and cool temperatures at night.

To get your mushrooms to propagate take off the head and place the stalk into your topsoil, making sure to expose the top to the air. If you have the right conditions for your mushroom you will have a new head grow from your base. You should have some very clear feedback if your mushroom has taken or not very quickly.
Growing Pineapple


pineapple root buds

To start growing pineapple you will need to take the leafy green top and remove all the fruit (yellow parts). To harvest a starting piece form a pineapple take a good grip of the leaves and twist the crown off of the fruit. If the brut force tactic isn’t for you can take a good chef’s knife and slice of the top of the pineapple and scrap off the flesh of the fruit with a spoon. Take a sharp knife and begin to slice small horizontal pieces off of the bottom of the crown till you can see root buds (picture left). Peel off a few layers of the leaves from the base of your pineapple cutting.


growing pineapple from kitchen scraps

With your prepped pineapple cutting prepare a container of warm water and place it cut side into the container. When the cutting begins to root replant it into a container with soil and be sure to water once a week. This kitchen scrap recycle is a long game, you won’t have a pineapple worth harvesting for 2-3 years.
Avocados

Rather than tossing your avocado seed when you’re getting the fleshy fruit for your cooking use it to grow your own avocado plant. Warning this one is going to take even longer to fruit then the pineapple if ever. House grown avocado plants rarely fruit and if you can grow it outdoors it could be 5 to 13 years before your eating your own avocados. People who farm avocados grown them off grafts (maybe a good idea for another article?!).


growing avocados from kitchen scraps

Take your seed and wash in the sink, with your cleaned seed stick in three or four toothpicks and suspend it above a glass of water. You want to place the seed broad end down and cover the seed with around an inch of water. Place your container into a warm area in an area with filtered sunlight and add water as needed. Within 2 – 6 weeks you will see roots and a stem begin to sprout. Once your avocado has a stem that is 7 inches long cut it back to 3 inches, this will focus the seeds back in to growing a strong root system. When your roots are thick and the stem has re-leafed take out the toothpicks and place the plant into a rich humus soil. I suggest using a 10 inch diameter pot. Leave the seed half exposed when you plant it into the soil.


planting avocados from kitchen scraps

Now that your plant is in the soil you want to supply it with a continual supply of light watering with an occasional deep soak. Avocados prefer a soil kept moist but you want to avoid saturating it too much and drowning the roots. If your leaves begin to turn yellow you are watering it too much, give the plant a few days of from watering. Now that the plant is established you want to begin to give it as much sunlight as you can. If you notice that your leaves are beginning to brown at the tips you have a salt build up in your soil and you will need to water the soil thoroughly and let it drain. Once your stem reaches 12 inches in height you will want to cut it back to 6 inches to help new shoots grow.
Growing Carrot-tops | Fun For The Kids

Because carrots are a tap-root you can’t actually regrow the part we all eat. You can how ever grow a fun attractive flowering plant for your kitchen. Growing the carrots is a my son’s favorite from this list.

The next time you buy carrots for cooking cut off the tops leaving and inch or so of the vegetable attached. Just like the avocado take several toothpicks and stick them into the side of carrot. Place your carrot cutting into a container with water high enough to reach the bottom of your cutting. Place your container in an area that will receive filtered sunlight and make sure that as the water evaporates or is consumed by the carrot you replace it to keep the bottom of the carrot wet. Within a few days you should see the roots begin to sprout. When you see you roots sprouting you can transplant the plant into a bed of soil.

Depending on your conditions your success may vary from mine, God knows I’m not always successful with my attempts. These are great activities for black thumbs because you’re using kitchen scraps rather than spending money on saplings or seeds. Do you have any suggestions of plants we missed, share with us in the comments below!


If you need help growing herbs in your kitchen check out these herb growing kits from Amazon. I just bought one of them for my sister as a house warming gift. What a good brother I am.


For more information see Black Thumb Gardener.


Twitter Delicious Facebook Digg Stumbleupon Favorites More